Temporal Platform security features
This guide is a work in progress. Some sections may be incomplete. Information may change at any time.
For information about the general security habits of Temporal Technologies see our company security page.
The Temporal Plaform is designed with security in mind, and there are many features that you can use to keep both the Platofrm itself and your user's data secure.
A secured Temporal Cerver has its network communication encrypted and has authentication and authorization protocols set up for API calls made to it. Without these, your server could be accessed by unwanted entities.
What is documented on this page are the built-in opt-in security measures that come with Temporal. However users may also choose to design their own security architecture with reverse proxies or run unsecured instances inside of a VPC environment.
Server Samples
The https://github.com/temporalio/samples-server repo offers two examples, which are further explained below:
- TLS: how to configure Transport Layer Security (TLS) to secure network communication with and within a Temporal cluster.
- Authorizer: how to inject a low-level authorizer component that can control access to all API calls.
Encryption in transit with mTLS
Temporal supports Mutual Transport Layer Security (mTLS) as a way of encrypting network traffic between the services of a cluster and also between application processes and a Cluster. Self-signed or properly minted certificates can be used for mTLS. mTLS is set in Temporal's TLS configuration. The configuration includes two sections such that intra-Cluster and external traffic can be encrypted with different sets of certificates and settings:
internode: Configuration for encrypting communication between nodes in the cluster.frontend: Configuration for encrypting the Frontend's public endpoints.
A customized configuration can be passed using either the WithConfig or WithConfigLoader Server options.
See TLS configuration reference for more details.
Authentication
There are a few authentication protocols available to prevent unwanted access such as authentication of servers, clients, and users.
Servers
To prevent spoofing and MITM attacks you can specify the serverName in the client section of your respective mTLS configuration.
This enables established connections to authenticate the endpoint, ensuring that the server certificate presented to any connecting Client has the appropriate server name in its CN property.
It can be used for both internode and frontend endpoints.
More guidance on mTLS setup can be found in the samples-server repo and you can reach out to us for further guidance.
Client connections
To restrict a client's network access to cluster endpoints you can limit it to clients with certificates issued by a specific Certificate Authority (CA).
Use the clientCAFiles/ clientCAData and requireClientAuth properties in both the internode and frontend sections of the mTLS configuration.
Users
To restrict access to specific users, authentication and authorization is performed through extensibility points and plugins as described in the Authorization section below.
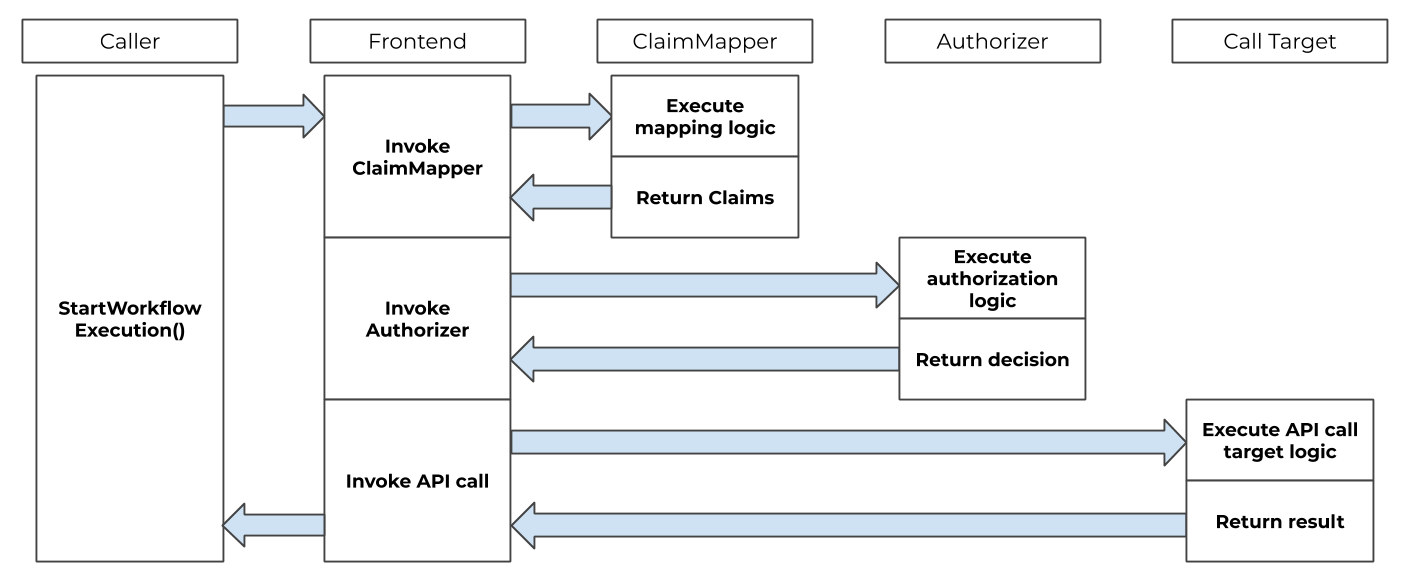
Authorization
Information regarding Authorizer and ClaimMapper has been moved to another location.
Temporal offers two plugin interfaces for implementing API call authorization:
The authorization and claim mapping logic is customizable, making it available to a variety of use cases and identity schemes. When these are provided the frontend invokes the implementation of these interfaces before executing the requested operation.
See https://github.com/temporalio/samples-server/blob/main/extensibility/authorizer for a sample implementation.
Single sign-on integration
Temporal can be integrated with a single sign-on (SSO) experience by utilizing the ClaimMapper and Authorizer plugins.
The default JWT ClaimMapper implementation can be used as is or as a base for a custom implementation of a similar plugin.
Temporal Web
To enable SSO for the Temporal Web UI edit the web service's configuration per the Temporal Web README.
Data Converter
A Data Converter is a Temporal SDK component that encodes and decodes data entering and exiting a Temporal Server.
- TypeScript: Data Converters
- Go: Create a custom Data Converter

Data is encoded before it is sent to a Temporal Server, and it is decoded when it is received from a Temporal Server.
The main pieces of data that run through the Data Converter are arguments and return values:
- The Client:
- Encodes Workflow, Signal, and Query arguments.
- Decodes Workflow and Query return values.
- The Worker:
- Decodes Workflow, Signal, and Query arguments.
- Encodes Workflow and Query return values.
- Decodes and encodes Activity arguments and return values.
Each piece of data (like a single argument or return value) is encoded as a Payload Protobuf message, which consists of binary data and key-value metadata.
Default Data Converter
Each Temporal SDK includes a default Data Converter. In most SDKs, the default converter supports binary, JSON, and Protobufs. (In SDKs that cannot determine parameter types at runtime—like TypeScript—Protobufs aren't included in the default converter.) It tries to encode values in the following order:
- Null
- Binary
- Protobuf JSON
- JSON
For example:
- If a value is an instance of a Protobuf message, it will be encoded with proto3 JSON.
- If a value isn't null, binary, or a Protobuf, it will be encoded as JSON. If any part of it is not serializable as JSON (for example, a Date—see JSON data types), an error will be thrown.
The default converter also supports decoding binary Protobufs.
Custom Data Converter
Applications can create their own custom Data Converters to alter the format (for example using MessagePack instead of JSON) or add compression or encryption.
To use a custom Data Converter, provide it in the following contexts:
- The Client and Worker in the SDKs you use.
- Temporal Web via
tctl data-converter web(for displaying decoded data in the Web UI). tctlvia--data-converter-plugin(for displaying decoded headers intctloutput).
Custom Data Converters are not applied to all data:
searchAttributesare always encoded with JSON.- Headers are not encoded by the SDK (the one exception will be—when implemented—the SDK running OTel baggage through custom Codecs).
Payload Codecs
In TypeScript and Go, data conversion happens in two stages:
- A Payload Converter converts a value into a
Payload. - A Payload Codec transforms an array of Payloads (for example, a list of Workflow arguments) into another array of Payloads.
The Payload Codec is an optional step that happens between the wire and the Payload Converter:
Temporal Server <--> Wire <--> Payload Codec <--> Payload Converter <--> User code
Common Payload Codec transformations are compression and encryption.
In codec implementations, we recommended running the function (whether it be compressing, encrypting, etc) on the entire input Payload, and putting the result in a new Payload's data field. That way, the input Payload's headers are preserved. See, for example:
ZlibCodecin the Go SDK- Encryption Data Converter in Go's encryption sample
Encryption
Doing encryption in a custom Data Converter ensures that all application data is encrypted during the following actions:
- Being sent to/from Temporal Server.
- Moving inside Temporal Server.
- Stored by Temporal Server.
Then data exists unencrypted in memory only on the Client and in the Worker Process that is executing Workflows and Activities on hosts that the application developer controls.
Our encryption samples use AES GCM with 256-bit keys:
Codec Server
A Codec Server is a feature that can perform additional levels of encoding and decoding on Payloads that are handled by tctl or the Web UI.
The Web UI and tctl both use a default Data Converter, which is capable of serialization only.
Codec Servers can encrypt, compress, and change the format of a Payload object. These measures can further secure your data.

Use case: tctl
Suppose that you want to view Workflow History. This information needs to be decoded before it can be viewed.
You can use tctl workflow showid to view a Workflow Execution Event History.
tctl workflow showid <workflowID>
With a Codec Server, the Payload is decoded before being deserialized by tctl's default Data Converter. The default Data Converter sends the Payload to a given endpoint, and receives a decoded Payload if the API returns a successful result.
The Data Converter passes this result back to the command line, which prints the decoded result.
Use case - Web UI
Workflow Execution Event History is available in the Web UI. Payload information for each Event is captured within Event 'input' and 'result' fields. Without a Codec Server, this information remains encoded.
Passing these Payloads through a Codec Server returns decoded results to the Web UI. Make sure to enter a valid URL and port for the codec endpoint when configuring the Codec Server.
Codec Server
The Codec Server Go sample is an example that shows how to decode a Payload that has been encoded so the Payload can be displayed by tctl and the Web UI.
A codec HTTP protocol specifies two endpoints to handle Payload encoding and decoding.
Implementations must do the following:
- Send and receive Payloads protobuf as JSON.
- Check only the final part of the incoming URL to determine whether the request is for /encode or /decode.
A Temporal Cluster should already be in operation before starting the Codec Server.
tctl
Configure the codec endpoint:
tctl --codec_endpoint 'http://localhost:{PORT}/{namespace}' workflow show --wid codecserver_workflowID
Web UI
codec:
    endpoint: {{ default .Env.TEMPORAL_CODEC_ENDPOINT "{namespace}"}}
The codec endpoint can be specified in the configuration file. It can also be changed during runtime.
Select the button with an up-down arrow in the left area of the screen. This action displays the codec endpoint dialog.
Enter the URL and port number for your codec endpoint. Exit the dialog, go back to the previous page, and refresh the page.
The button should now be light blue, and your Payloads should be displayed in a readable format.
Plugins
Temporal Clusters support some pluggable components.
Claim Mapper
The Claim Mapper component is a pluggable component that extracts Claims from JSON Web Tokens (JWTs).
This process is achieved with the method GetClaims, which translates AuthInfo structs from the caller into Claims about the caller's roles within Temporal.
A Role (within Temporal) is a bit mask that combines one or more of the role constants.
In the following example, the role is assigned constants that allow the caller to read and write information.
role := authorization.RoleReader | authorization.RoleWriter
GetClaims is customizable and can be modified with the temporal.WithClaimMapper server option.
Temporal also offers a default JWT ClaimMapper for your use.
A typical approach is for ClaimMapper to interpret custom Claims from a caller's JWT, such as membership in groups, and map them to Temporal roles for the user.
The subject information from the caller's mTLS certificate can also be a parameter in determining roles.
AuthInfo
AuthInfo is a struct that is passed to GetClaims. AuthInfo contains an authorization token extracted from the authorization header of the gRPC request.
AuthInfo includes a pointer to the pkix.Name struct.
This struct contains an x.509 Distinguished Name from the caller's mTLS certificate.
Claims
Claims is a struct that contains information about permission claims granted to the caller.
Authorizer assumes that the caller has been properly authenticated, and trusts the Claims when making an authorization decision.
Default JWT ClaimMapper
Temporal offers a default JWT ClaimMapper that extracts the information needed to form Temporal Claims.
This plugin requires a public key to validate digital signatures.
To get an instance of the default JWT ClaimMapper, call NewDefaultJWTClaimMapper and provide it with the following:
- a
TokenKeyProviderinstance - a
config.Authorizationpointer - a logger
The code for the default ClaimMapper can also be used to build a custom ClaimMapper.
Token key provider
A TokenKeyProvider obtains public keys from specified issuers' URIs that adhere to a specific format.
The default JWT ClaimMapper uses this component to obtain and refresh public keys over time.
Temporal provides an rsaTokenKeyProvider.
This component dynamically obtains public keys that follow the JWKS format.
rsaTokenKeyProvider uses only the RSAKey and Close methods.
provider := authorization.NewRSAKeyProvider(cfg)
KeySourceURIs are the HTTP endpoints that return public keys of token issuers in the JWKS format.
RefreshInterval defines how frequently keys should be refreshed.
For example, Auth0 exposes endpoints such as https://YOUR_DOMAIN/.well-known/jwks.json.
By default, "permissions" is used to name the permissionsClaimName value.
Configure the plugin with config.Config.Global.Authorization.JWTKeyProvider.
JSON Web Token format
The default JWT ClaimMapper expects authorization tokens to be formatted as follows:
Bearer <token>
The Permissions Claim in the JWT Token is expected to be a collection of Individual Permission Claims. Each Individual Permission Claim must be formatted as follows:
<namespace> : <permission>
These permissions are then converted into Temporal roles for the caller. This can be one of Temporal's four values:
- read
- write
- worker
- admin
Multiple permissions for the same Namespace are overridden by the ClaimMapper.
Example of a payload for the default JWT ClaimMapper
{
   "permissions":[
      "system:read",
      "namespace1:write"
   ],
   "aud":[
      "audience"
   ],
   "exp":1630295722,
   "iss":"Issuer"
}
Authorizer Plugin
The Authorizer plugin contains a single Authorize method, which is invoked for each incoming API call.
Authorize receives information about the API call, along with the role and permission claims of the caller.
Authorizer allows for a wide range of authorization logic, including call target, role/permissions claims, and other data available to the system.
Configuration
The following arguments must be passed to Authorizer:
context.Context: General context of the call.authorization.Claims: Claims about the roles assigned to the caller. Its intended use is described in theClaimssection earlier on this page.authorization.CallTarget: Target of the API call.
Authorizer then returns one of two decisions:
DecisionDeny: the requested API call is not invoked and an error is returned to the caller.DecisionAllow: the requested API call is invoked.
Authorizer allows all API calls pass by default. Disable the nopAuthority authorizer and configure your own to prevent this behavior.
Configure your Authorizer when you start the server via the temporal.WithAuthorizer server option.
If an Authorizer is not set in the server options, Temporal uses the nopAuthority authorizer that unconditionally allows all API calls to pass through.
a := authorization.NewDefaultAuthorizer()
Authorize API calls
When authentication is enabled, you can authorize API calls made to the Frontend Service.
- Go
- Java
- PHP
- Python
- TypeScript
Content is currently unavailable.
The Temporal Server expects an authorization gRPC header with an authorization token to be passed with API calls if requests authorization is configured.
Authorization Tokens may be provided to the Temporal Java SDK by implementing a io.temporal.authorization.AuthorizationTokenSupplier interface.
The implementation should be used to create io.temporal.authorization.AuthorizationGrpcMetadataProvider that may be configured on ServiceStub gRPC interceptors list.
The implementation is called for each SDK gRPC request and may supply dynamic tokens.
JWT
One of the token types that may be passed this way are JWT tokens. Temporal Server provides a default implementation of JWT authentication.
Example
  AuthorizationTokenSupplier tokenSupplier =
    //your implementation of token supplier
    () -> "Bearer <Base64 url-encoded value of the token for default JWT ClaimMapper>";
  WorkflowServiceStubsOptions serviceStubOptions =
    WorkflowServiceStubsOptions.newBuilder()
      //other service stub options
      .addGrpcMetadataProvider(new AuthorizationGrpcMetadataProvider(tokenSupplier))
      .build();
  WorkflowServiceStubs service = WorkflowServiceStubs.newServiceStubs(serviceStubOptions);
  WorkflowClient client = WorkflowClient.newInstance(service);
Content is currently unavailable.
Content is currently unavailable.
Content is currently unavailable.